A Simple Virtual Network based on proxy ARP and Policy Based Routing

Introduction

Choosing a Virtual networking to connect VMs or Containers across Hosts is always a complicated decision. Most of us would have found the virtual networking on a single VM/Container Host to be very simple, easy to implement and debug. Just plug the VM/Container to a bridge and your are done. For access from the host, assign an IP to the bridge(you may need a NAT rule to access the internet from the VM, if you are doing private networks). But as we try to connect VMs/Containers across Hosts we are faced with a difficult choice, we can either go with a simple solution like VLANs and deal with physical switches or choose between the various overlay tunnel options.

Note for the impatient: If you are already aware of the paradigm of various virtual networking mechanisms, try the summary section which presents the solution in short.

VLANs are easy to debug but it needs configuration of the physical switches which are most often off limits. In a small office you might have a shared switch and any change in the switch configuration might impact the whole office. With multiple switches connecting your Hosts managing VLANs is complex (yes we can look at automation and management solution but that brings its own challenges). And sometimes we are also faced with unmanaged switches where VLANs are not an option.

Overlays on the other hand skip the need to have physical switch access and instead handle configuration at the (virtual switch on the) VM/Container host. The problem with this approach is the lack of visibility of the traffic (encapsulated packets) on the virtual network which makes debugging as much difficult. Another issue is the distributed nature of tunnel based Overlays, we have a full mesh of tunnels connecting each VM/Container host to all other hosts (debugging partial mesh and tunnels over UDP are more convoluted).

An alternative to this is to use a IP network to connect your Hosts, but for the this to work you need to subnet your IP range so that each of the Hosts can get its own subnet and allocate IPs to the VM/Containers from this subnet. The easiest approach is to take a huge (/16 or sometimes /8)subnet and curve out a subnet for each of the VM/Container Hosts. While planning such a network we need to keep in mind the future need to add more VM/Container Hosts and the maximum number of VM/Containers that a Host will ever support. Other IP based solution also depends on running routing protocols to synchronise routes across

Recently I faced the same dilemma while designing an automation framework for a hosting VMs across a group of Physical Host. VLAN of-course was the first choice due to its simplicity but we quickly saw the issue with accessing physical switch configuration and the problems of mis-configuration. (and even while using a management solution)

So I decided to investigate if I can design a virtual network with the following attributes

  • No ARP storm
  • No Routing Protocols (at least to start with)
  • No Overlay
  • No VLAN
  • and no Complex Subnetting (see above)

The aim is to use the commonly available networking capabilities of linux kernel to provide network connectivity to the VMs on the virtual network.

In this blog I will present the design of my proposed solution.

The Simple Part

Let’s start with the simplest building block of the network. Connecting the VMs on a single Host. I decided to use a linux bridge to connect all VMs launched on a host on a given network. This means I will create one bridge per virtual network on the Host and all the VMs on this virtual network on the host will connect to this bridge. Assign IPs to your VMs within your network from the associated subnet and all the VMs can communicate to each other over the bridge. To provide connectivity from the Host to the VMs I also added an IP to the bridge from the same subnet range.

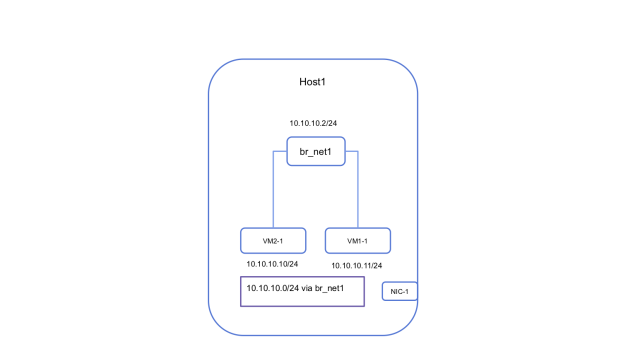
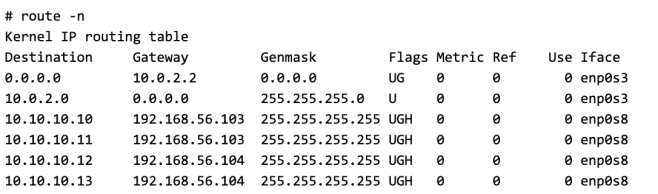
The following is the state of the routing table on the host after adding the bridge IP.

SS1

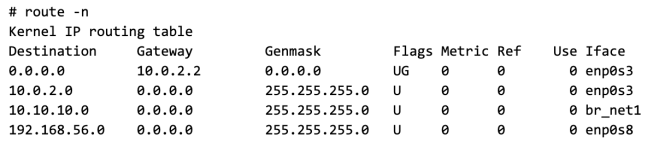
Note: I have 2 network interface on the Host (this is not necessary for the proposed network design, but just the way my Host is setup)

  • enp0s3 connects to internet
  • enp0s8 connects to the private lan, this is what I will use to connect the hosts

Connecting VMs on multiple Hosts

The above procedure can be replicated on other Hosts to start VMs and connect them locally. The only constraint here is that VM IPs should not conflict with each other.

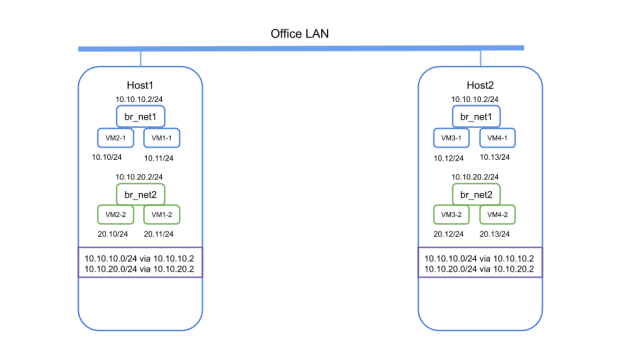
For explanation, let’s say that we have started the following VMs on two different hosts on a network called net1 with associated subnet 10.10.10.0/24

Host Name Host IP VM Name VM IP
Host1 192.168.56.103 VM1 10.10.10.10/24
VM2 10.10.10.11/24
Host2 192.168.56.104 VM3 10.10.10.12/24
VM4 10.10.10.13/24
Router 192.168.56.101

The bridge on each of the host are called br_net1 and is given an ip of 10.10.10.2/24(yes I am configuring the same IP on bridge on all the Hosts)

Now from the VM1 if we try to ping VM3 on Host2 it will fail as the bridge on Host1 has no knowledge of the MAC of VM3 as they are on two different L2 segments.

Resolving MAC address of remote VMs

To resolve the above situation I enabled proxy arp on the bridge. Please see my previous post for other examples where i used the same solution.

echo 1 > /proc/sys/net/ipv4/conf/br_net1/proxy_arp

This will allow the bridge to respond with its own MAC when an ARP query made by any connected VM and the destination IP is not known to the bridge.

SS2.png

In this example you can see that the MAC of VM3 (10.10.10.12) is same as that of the bridge(10.10.10.2)

Sending Packet to a remote VM

Once the Bridge responds to the ARP query, VM1 will send the ping packet to the bridge. The kernel on the Host1 now has to decide the where to route the packet for VM3 by doing a route lookup. Linux by default will not forward packets across directly connected networks. To enable this behavior we need to enable ip_forwarding on the Host.

echo 1 > /proc/sys/net/ipv4/ip_forward

Now if we can make sure that the correct route exists on Host1 to reach VM3, we will be able to complete half of the round trip for the ping packet.

Introducing the Router (just another Linux Machine)

To resolve the routing problem we introduce another component in to the picture, which is a router. The router is connected to the same LAN to which the Host1 and Host2 are connected and its IP is 192.168.56.101(mentioned in the table above).

Although we can eliminate the need for a router by programming the routes on the Hosts, that approach will need managing a distributed routing table configuration across hosts. Using a central router makes managing configuration simpler.

The router is programmed with the correct destination for each of the VM using host routes. Here is an example of the routing table on the Router.

SS3.png

If we can send the packet destined to VM3 to this router, the router forward it to Host2(192.168.56.104) which we know in turn can forward it to VM3.

But first we have to solve another problem with routing.

Recalling from the previous illustration the routing table on the Host1 already has a route entry for net1 (10.10.10.0/24)

SS4.png

This is because the br_net1 interface is already configured with the ip of 10.10.10.2/24 and the linux kernel know that host1 is directly connected to net1. If we remove this route or the IP on the bridge the host cannot forward packets to the VMs connected to the bridge. With this route present we cannot forward packets on 10.10.10.0/24 to the router.

We will have the same configuration in the routing table of Host2 as Host2 is configured exactly the same way as Host1.

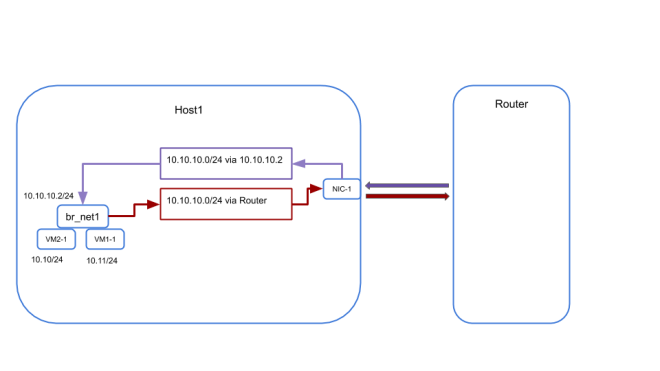
Resolving the Multiple route problem

To resolve this issue we will use policy based routing provided by linux kernel. You can get details of policy routing on linux in my previous post. In short policy based routing helps in route selection based on the attributes of the packet. In this case we will use the ingress port of the packet to decide which route to select for the packet.

Policy routing is enabled in two steps.

  • Create an alternate routing table which will hold the custom routing rules
  • Create a policy routing rule to select which table to use based on the properties of the packet

First we will create a separate routing table. The new routing table is identified by a routing table id (101) and name (sdn_net)

echo "101 sdn_net" >> /etc/iproute2/rt_tables

This table is configured with the following routes

ip route add 10.10.10.0/24 via 192.168.56.101 table sdn_net
ip route add default via 192.168.56.101 table sdn_net

To view the route entries in the table use the following command

SS5.png

Now we will add routing rule to select the correct routing table when forwarding traffic. The routing rule is based on the follow condition

  • if a packet enters the Host1 through the bridge br_net1 it must be trying to reach an IP not available on the VMs directly connected to the bridge. All such packets must be forwarded to the router and and so must use the new routing table we created.
  • While if the packet enters the Host through of its other network interfaces it might be destined for the VMs and they can continue to use the main routing table as usual.

Use the following command to create the rule

# ip rule add iif br_net1 lookup sdn_net

VLAN-5

Once the new routing table and the policy routing rules are applied to both the hosts the ping packet can complete its complete path and you should have connectivity between VMs across Hosts

Running multiple virtual networks and routing between them

With the previous step we achieved connectivity between VMs on the same network, but how do we enable VMs on one network to communicate to VMs one another network?

To do this we need to have a gateway configured for each of the virtual networks.

  • The VMs must be configured to use this gateway as the default route.
  • Default route must be added to the alternate route table we created
  • The gateway IP itself must be configured on the loopback interface on the router as a /32 address.

Once this is done for both the virtual network, VMs in one network can reach the VM on other.

Connecting to the internet

If you are creating network with subnets carved out of your office network (i.e. the IPs are routable in your office/home network you can make an route entry on your main router to forward all traffic for your virtual networks to the router we configured above and you should have internet connectivity.

But if you are running isolated virtual networks and the companies router does not have any configuration for your network. In that case you will need to apply NAT for all traffic going out of your virtual network.

A simple and manageable way to do this is to use iptables rule in conjunction with ipsets. To do this, create an ipset on the router as follows.

ipset create sdn_net hash:net

Add any network that needs Internet access to this ipset

ipset -A sdn_net 10.10.10.0/24

Following iptables rule can used to provide internet access.

iptables -t nat -A POSTROUTING -m set --match-set sdn_net src -j MASQUERADE

While using ipsets there is no need to change the iptables rule whenever a new virtual network is added or removed. Instead you can just update the ipset with the correct network list and iptables will pick it up.

Summary

Here is a quick summary how the virtual network works

  • All VM on a network on a Host connect to a bridge
  • All VMs and the bridge get an IP from the subnet associated with the network
  • This creates a routing entry in the main routing table of the Host and makes the virtual network directly connected to the Host
  • We enable proxy arping on the bridge to respond to any unanswered ARP query. This will be used to respond to the ARP queries for VMs hosted on remote hosts.
  • We enable IP forwarding to make sure packet reaching the bridge due to proxy arping can be forwarded to other networks
  • We add a router to the topology to forward traffic between VM on different Hosts and configure it with host routes for VMs
  • Finally we solve the different routes for ingress and egress packets from the bridge using policy based routing rules and alternate routing table.

Trying it out

While it is possible to test this solution by setting up your own lab. I have written a python program to automat the test setup. To try it out you will need 3 test machine connected to the same LAN(Host1, Host2 and Router). These machines can be VM. I used network namespaces to simulate the VMs that are launched on Host1 and Host2. The script can run from any machine but needs SSH Key based access to the root account of the 3 Hosts.   The code can be found here

Conclusion

So what are the advantage of using this network.

  • Ease of deployment, no need to manage VLANs, configuring switches
  • Ease of debugging, as all the features that we used are part of the linux kernel and mostly are layer 3 we can use regular debugging tools like ping, traceroute, tcpdump to debug the setup
  • Easily extensible, as we are not constrained by subnetting, no of tunnels etc. we can scale the solution horizontally
  • No ARP beyond the Host, any unanswered ARP queries originating in the VM are responded by the bridge. So your office switch never sees the ARPs from the VMs and the VM macs don’t overflow the mac tables of the physical switch
  • As we are dealing with L3 packets we can use VRRP or ECMP for providing HA and Load Balancing

Using Mininet to test OpenStack Firewall drivers

OpenStack FWaaS project will be supporting a Layer 2 firewall based on OVS flow rules. While working on the OVS driver, I felt the need to do some quick tests to check if the flow rules are programmed correctly on the OVS bridge.

Although we can run a complete devstack system within a VM, to run a firewall test would mean running at least 2 nova instances and configuring the ports with FWaaS and SG policies. And unless I include other means it will need a lot of manual configuration.

With multiple nova instances running within the devstack VM, it quickly becomes a resource hog on a laptop. Manual bring up of topology even the simplest one is very painful and error prone for the quick setup and tear-down I needed

This is where I decided to test the new OVS Firewall driver using Mininet. Mininet provides easy way to setup network topology using Network Namespaces as hosts connected to OVS based switches(although other switch modes are also available)

The test setup for the Firewall Driver

For my tests, I needed a simple 2 node topology connected to a OVS switch. The firewall policies are pushed using openflow rules. Mininet supports OVS switches either connected to SDN controllers or as standalone bridges called OVSBridge.

Slide1

For the tests, we need a standalone OVS bridge and the Firewall driver will be used to configuring the flow rules.

To start the simulation, all we need is to specify the topology and mininet can deploy the same with bridges and namespace. The topology can either be custom made using host, switch and link definition e.g. link1 or we can use one of the prepackaged typologies that comes along with mininet link2

Compared to the nova instance VMs this is very lite on resources.

Configuration and access to hosts

One of the good things about mininet topology is that all the components come up with default config. The Namespaces are connected to the bridge and configured with IP address, all interfaces are up and IP connectivity is available as soon as the topology is deployed. Mininet also provides APIs to access the configuration. This helps in easy customization of the configuration and integration of the topology with the rest of the automation.

In the default configuration, the OVS bridge is configured with a single flow rule to make it work like a normal switch. For my tests, I had to remove this rule as more detailed flow configuration will be pushed by the Firewall driver based on the security policy.

It is also possible to run custom commands within the hosts. This is important as we need to start some process to open TCP ports to check the firewall policy. I used netcat to start a tcp server on each of the host and check the connectivity over the firewall.

Demo

Here is a demo of the simulator in action. The SG and FWaaS policies are configured to allow ICMP and TCP port 8000 traffic. The policies are tested with firewall driver set to SG, FWaaS and both.


The following CLI can be used to view a running trace of the rule hit counts in OVS.

sudo watch 'ovs-ofctl dump-flows s1|grep -v n_packets=0|sed -r "s/\S+//2"|sed -r "s/\S+//5"| sed -r "s/\S+//1"'

The simulator code

The complete code for this automation is quite small and is available as a single file. It allows deploying the 2-node topology and configuring the firewall policy and once the configuration is done the user lands on the CLI prompt. This can be used to do the traffic tests.

The details of using the script can be found in the README


Test driving App Firewall with IPTables

With more and more application moving to the cloud, web based applications have become ubiquitous. They are ideal for providing access to applications sitting on the cloud (over HTTP through a standard web browser). This has removed the need to install specialized application on the client system, the client just needs to install is a fairly modern browser.

While this is good for reducing load on the client, the job of the firewall has become much tougher.

Traditionally firewall rules look at the Layer 3 and Layer 4 attributes of a packet to identify a flow and associate it with applications generating the traffic. To a traditional firewall looking at L3/L4 headers all the traffic between the client and different web apps looks like http communication. Without proper classification of traffic flows the firewall is not be able to apply a security policy.

It has now become important to look at the application layer to identify the traffic associated with a web service or web application and enforce effective security and bandwidth allocation policy.

In this blog, I will look at features provided by IPTables that can be used to classify packets by application Layer header and how this can be used to implement security and other network policy.

Looking in to the application layer

IPTables are the de-facto choice for implementing firewall on Linux. It provides extensive packet matching, classification, filtering and many more facilities. Like any traditional firewall the core features of IPTables allow packet matching with Layer3 and Layer4 header attributes. These features as we discussed in the introduction may not be sufficient to differentiate between traffic from various web apps.

While researching for a solution to provide APP Firewall on Linux I came across an IPTables extensions called NFQUEUE.

The NFQUEUE extension provides a mechanism to pass a packet to a user-space program which can run some kind of test on the packet and tell IPTables what action(accept/drop/mark) to perform for the packet.

appfw

This gives a lot of flexibility for the IPTables user to hook up custom tests for the packets before it is allowed to pass through the firewall.

To understand how NFQUEUE can help classify and filter traffic based on application layer headers, let’s try to implement a web app filter providing URL based access control. In this test we will extract the request URL from the HTTP header and the filter will allow access based on this URL

A simple web app

For this experiment, we will use python bottle to deploy two application. Access will be allowed for the first app(APP1) while access to the second app(APP2) will be denied.

We will use the following code to deploy the sample Apps

from bottle import Bottle

app1 = Bottle()
app2 = Bottle()

@app1.route('/APP1/')
def app1_route():
    return 'Access to APP1!\n'


@app2.route('/APP2/')
def app2_route():
    return 'Access to APP2!\n'


if __name__ == '__main__':
    app1.merge(app2)
    app1.run(server='eventlet', host="192.168.121.22", port=8081)

The web application will bind to port 8081 and local IP of 192.168.121.22.

NOTE: we need a eventlet based bottle server else the application hangs after a deny from the app filter(connections are not closed and the next request is not processed)

To access the web apps use the curl commands

curl http://192.168.121.22:8081/APP1/
curl http://192.168.121.22:8081/APP2/

Configuring the IPTables NFQUEUE

The next step is to configure IPTables to forward the client traffic accessing the web apps to our user space web-app filter.

The NFQUEUE IPTables extension works by adding a new target to IPTables called NFQUEUE. This target allows IPTables to put the matching packet on a queue. These packets can then be read from this queue by a filter application in user space. The filter application can then perform custom tests and provide a verdict to allow or deny the packet.

The NFQUEUE extension provides 65535 different queues. It also provides fail-safe options like what action IPTables should take if a queue is created but no filter is attached to it, load balancing of packets across multiple queues. Also, there are knobs in the /proc filesystem to control how much of the packet data will be copied to user space. A complete list of options can be found in the iptables extensions man page

To enable NFQUEUE for the web-app traffic we will add the following rule to IPTables.

iptables -I INPUT -d 192.168.121.22 -p tcp --dport 8081 -j NFQUEUE --queue-num 10 --queue-bypass

The –queue-num option selects the NFQUEUE number to which the packet will be queued. The –queue-bypass option allows the packet to be accepted if no custom filter is attached to queue number 10, without this option if no filter is attached to the queue, packets will be dropped.

Implementing a simple APP filter

With the above IPTables rule the packets destined for our sample web app will be pushed into NFQUEUE number 10.  I am going to use the python bindings for NFQUEUE called nfqueue-bindings to develop the filter. Let’s run a simple print and drop filter.

#!/usr/bin/python

# need root privileges

import struct
import sys
import time

from socket import AF_INET, AF_INET6, inet_ntoa

import nfqueue
from dpkt import ip


def cb(i, payload):
    print "python callback called !"
    payload.set_verdict(nfqueue.NF_DROP)
    return 1

def main():
    q = nfqueue.queue()
    
    print "setting callback"
    q.set_callback(cb)
    
    print "open"
    q.fast_open(10, AF_INET)
    q.set_queue_maxlen(50000)
    
    print "trying to run"
    try:
    	q.try_run()
    except KeyboardInterrupt, e:
    	print "interrupted"
    
    print "unbind"
    q.unbind(AF_INET)
    print "close"
    q.close()

if __name__ == '__main__':
    main()

Now we have tested that the packets trying to access our web app are passing through a app filter implemented in user space. Next we need to unpack the packet and look at the HTTP header to extract the URL that the user is trying to access. For unpacking the headers we will use python dpkt library. The following code will let us access to APP1 and deny access to APP2

#!/usr/bin/python

# need root privileges

import struct
import sys
import time

from socket import AF_INET, AF_INET6, inet_ntoa

import nfqueue
import dpkt
from dpkt import ip

count = 0

def cb(i, payload):
    global count
    
    count += 1
    
    data = payload.get_data()

    pkt = ip.IP(data)
    if pkt.p == ip.IP_PROTO_TCP:
        # print "  len %d proto %s src: %s:%s    dst %s:%s " % (
        #        payload.get_length(),
        #        pkt.p, inet_ntoa(pkt.src), pkt.tcp.sport,
        #        inet_ntoa(pkt.dst), pkt.tcp.dport)
        tcp_pkt = pkt.data
        app_pkt = tcp_pkt.data
        try:
            request = dpkt.http.Request(app_pkt)
            if "APP1" in request.uri:
                print "Allowing APP1"
                payload.set_verdict(nfqueue.NF_ACCEPT)
            elif "APP2":
                print "Denying APP2"
                payload.set_verdict(nfqueue.NF_DROP)
            else:
                print "Denying by default"
                payload.set_verdict(nfqueue.NF_DROP)
        except (dpkt.dpkt.NeedData, dpkt.dpkt.UnpackError):
            pass
    else:
        print "  len %d proto %s src: %s    dst %s " % (
               payload.get_length(), pkt.p, inet_ntoa(pkt.src), 
               inet_ntoa(pkt.dst))


    sys.stdout.flush()
    return 1

def main():
    q = nfqueue.queue()

    print "setting callback"
    q.set_callback(cb)

    print "open"
    q.fast_open(10, AF_INET)

    q.set_queue_maxlen(50000)

    print "trying to run"
    try:
        q.try_run()
    except KeyboardInterrupt, e:
        print "interrupted"

    print "%d packets handled" % count

    print "unbind"
    q.unbind(AF_INET)
    print "close"
    q.close()
    
if __name__ == '__main__':
    main()

Here are the result of the test on the client

result1

The output from the filter on the firewall

result2

What else can be done with App based traffic classification

Firewall is just one use-case of the advance packet classification. With the flows identified and associated to different applications we can apply different routing and forwarding policy. NFQUEUE based filter can be used to set different firewall marks on the classified packets. The firewall marks can then be used to implement policy based routing in Linux.

Rate Limiting ACT broadband on Ubuntu

ISPs have started to provide high bandwidth connections while the FUP (Fair Usage Policy) limit is still not enough (I am using ACT Broadband). Once you decide to be on youtube most of the time the download limit gets exhausted rather quickly.

As I use Ubuntu for my desktop, I decided to use TC to throttle my Internet bandwidth to bring in some control over my Internet bandwidth usage. Have a look at my previous posts about rate limiting and  traffic shaping on Linux to learn about usage of TC.

Here is my modest network setup at home.

Slide1

The problem is that TC can throttle traffic going out on an interface but traffic shaping will not impact the download bandwidth.

The Solution

To get around this problem I introduced a Linux network namespace into the topology. Here is how the topology looks now.

Slide2

I use this script to setup the upload/download bandwidth limit.

Results

Here are readings before and after applying the throttle

Before

media-20160302

After rate-limiting to 1024Kbps upload and download

media-20160302-1.png

Visualizing KVM (libvirt) network connections on a Hypervisor

At times I have found the need to visualize the network connectivity of KVM instances on a Hypervisor Host. I normally use libvirt and KVM for launching my VM workloads. In this post we will look at a simple script that can parse the information available with libvirt and the host kernel to plot the network connectivity between the KVM instances. The script can parse Linux Bridge and OVS based switches.

It can generate a GraphViz based topology rendering (requires pygraphviz), can use networkx and d3js to produce a webpage which is exposed using a simple webserver or just a json output describing the network graph.

The source of the script is available here .

The following is a sample output of my hypervisor host.

SVG using d3js
d3_svg

PNG using GraphViz
gviz

Json text
json_net

Fullscreen display for Core Linux on VirtualBox

The default screen resolution for Core Linux on VirtualBox is 1024×768 and does not provide a good screen area usage.

defaultI came across this post on the Core Linux forum that provides steps to set the correct screen resolution. I am capturing the steps in this post for my reference, all credits are due to the original poster.

I found 1440×762 to be a better resolution if you are going to use VirtualBox in window mode, while 1440×900 is better suited for full-screen mode. In the following command “linux” is the name of my VM.

VBoxManage setextradata "linux" "VBoxInternal2/UgaHorizontalResolution" 1440
VBoxManage setextradata "linux" "VBoxInternal2/UgaVerticalResolution" 762
VBoxManage setextradata "linux" "CustomVideoMode1" 1440x762x24
VBoxManage setextradata "linux" "GUI/CustomVideoMode1" 1440x762x24

Once done you need to update the .xsession file in your home directory with the proper resolution

/usr/local/bin/Xvesa -br -screen 1440x762x24 ...

Now reboot the VM to activate the new resolution or you can exit to the prompt and restart the Window Manager with “startx” command

Here is the result after the configuration

custom

Bitmap resource pool


Bitmap resource pool

class BitMapPool:

    def __init__(self, start, end, bitmap=[]):
        self.start = start
        self.end = end
        if bitmap == []:
            bitmap = ['0' for i in range(0, end)]
        self.bitmap = bitmap

    def allocate(self):

        for i in range(self.start, self.end):
            if self.bitmap[i] == '0':
                self.bitmap[i] = '1'
                return i
        return None

    def free(self, i):
        if self.bitmap[i] == '1' and i in range(self.start, self.end):
            self.bitmap[i] = '0'

    def free_pool_size(self):
        count = 0
        for i in range(self.start, self.end):
            if self.bitmap[i] == '0':
                count += 1
        return count

def main():

    pool = BitMapPool(200, 400)
    for i in range(1, 100):
        res = pool.allocate()
        print "Res: %s \nBitmap: %s" % (res, ''.join(pool.bitmap))

    print "Free pool size: %s" % pool.free_pool_size()

    for i in range(250, 300):
        pool.free(i)
        print "Freeing %s" % i

    print "Free pool size: %s" % pool.free_pool_size()

    for i in range(1, 40):
        res = pool.allocate()
        print "Res: %s \nBitmap: %s" % (res, ''.join(pool.bitmap))

    print "Free pool size: %s" % pool.free_pool_size()
    _bitmap = pool.bitmap
    pool = BitMapPool(200, 400, _bitmap)
    for i in range(1, 30):
        res = pool.allocate()
        print "Res: %s \nBitmap: %s" % (res, ''.join(pool.bitmap))

    print "Free pool size: %s" % pool.free_pool_size()

if __name__ == '__main__':
    main()

Run Length Encoding

from itertools import groupby
import json

def encode(input_string):
    return [[len(list(g)), k] for k, g in groupby(input_string)]

def decode(lst):
    return ''.join(c * n for n, c in lst)

_str = ('000000000000000000000000000000000000000000000000000000000000000000000'
        '000000000000000000000000000000000000000000000000000000000000000000000'
        '000000000000000000000000000000000000000000000000000000000000001111111'
        '111111111111111111111111111111111111111111111111111111111111111111111'
        '111111111111111111111111111111111111111110000000000000000000000000000'
        '0000000000000000000000000000000000000000000000000000000')

#worst case
#_str = '10'*200

_enc = encode(_str)
_dec = decode(_enc)

print "Encoded:", json.dumps(_enc), 'Length:', len(json.dumps(_enc))
print "Decoded:", _dec, 'Length:', len(_dec)

#worst case
_str = '10' * 200

_enc = encode(_str)
_dec = decode(_enc)

print "Worst case Encoded:", _enc, 'Length:', len(json.dumps(_enc))
print "Worst case Decoded:", _dec, 'Length:', len(_dec)

OUTPUT

Encoded: [[200, "0"], [117, "1"], [83, "0"]] Length: 35
Decoded: 0000000000000000000000000000000000000000000000000000000000000000000000000000000000000000000000000000000000000000000000000000000000000000000000000000000000000000000000000000000000000000000000000000000011111111111111111111111111111111111111111111111111111111111111111111111111111111111111111111111111111111111111111111100000000000000000000000000000000000000000000000000000000000000000000000000000000000 Length: 400
Worst case Encoded: [[1, '1'], [1, '0'], [1, '1'], [1, '0'], [1, '1'], [1, '0'], [1, '1'], [1, '0'], [1, '1'], [1, '0'], [1, '1'], [1, '0'], [1, '1'], [1, '0'], [1, '1'], [1, '0'], [1, '1'], [1, '0'], [1, '1'], [1, '0'], [1, '1'], [1, '0'], [1, '1'], [1, '0'], [1, '1'], [1, '0'], [1, '1'], [1, '0'], [1, '1'], [1, '0'], [1, '1'], [1, '0'], [1, '1'], [1, '0'], [1, '1'], [1, '0'], [1, '1'], [1, '0'], [1, '1'], [1, '0'], [1, '1'], [1, '0'], [1, '1'], [1, '0'], [1, '1'], [1, '0'], [1, '1'], [1, '0'], [1, '1'], [1, '0'], [1, '1'], [1, '0'], [1, '1'], [1, '0'], [1, '1'], [1, '0'], [1, '1'], [1, '0'], [1, '1'], [1, '0'], [1, '1'], [1, '0'], [1, '1'], [1, '0'], [1, '1'], [1, '0'], [1, '1'], [1, '0'], [1, '1'], [1, '0'], [1, '1'], [1, '0'], [1, '1'], [1, '0'], [1, '1'], [1, '0'], [1, '1'], [1, '0'], [1, '1'], [1, '0'], [1, '1'], [1, '0'], [1, '1'], [1, '0'], [1, '1'], [1, '0'], [1, '1'], [1, '0'], [1, '1'], [1, '0'], [1, '1'], [1, '0'], [1, '1'], [1, '0'], [1, '1'], [1, '0'], [1, '1'], [1, '0'], [1, '1'], [1, '0'], [1, '1'], [1, '0'], [1, '1'], [1, '0'], [1, '1'], [1, '0'], [1, '1'], [1, '0'], [1, '1'], [1, '0'], [1, '1'], [1, '0'], [1, '1'], [1, '0'], [1, '1'], [1, '0'], [1, '1'], [1, '0'], [1, '1'], [1, '0'], [1, '1'], [1, '0'], [1, '1'], [1, '0'], [1, '1'], [1, '0'], [1, '1'], [1, '0'], [1, '1'], [1, '0'], [1, '1'], [1, '0'], [1, '1'], [1, '0'], [1, '1'], [1, '0'], [1, '1'], [1, '0'], [1, '1'], [1, '0'], [1, '1'], [1, '0'], [1, '1'], [1, '0'], [1, '1'], [1, '0'], [1, '1'], [1, '0'], [1, '1'], [1, '0'], [1, '1'], [1, '0'], [1, '1'], [1, '0'], [1, '1'], [1, '0'], [1, '1'], [1, '0'], [1, '1'], [1, '0'], [1, '1'], [1, '0'], [1, '1'], [1, '0'], [1, '1'], [1, '0'], [1, '1'], [1, '0'], [1, '1'], [1, '0'], [1, '1'], [1, '0'], [1, '1'], [1, '0'], [1, '1'], [1, '0'], [1, '1'], [1, '0'], [1, '1'], [1, '0'], [1, '1'], [1, '0'], [1, '1'], [1, '0'], [1, '1'], [1, '0'], [1, '1'], [1, '0'], [1, '1'], [1, '0'], [1, '1'], [1, '0'], [1, '1'], [1, '0'], [1, '1'], [1, '0'], [1, '1'], [1, '0'], [1, '1'], [1, '0'], [1, '1'], [1, '0'], [1, '1'], [1, '0'], [1, '1'], [1, '0'], [1, '1'], [1, '0'], [1, '1'], [1, '0'], [1, '1'], [1, '0'], [1, '1'], [1, '0'], [1, '1'], [1, '0'], [1, '1'], [1, '0'], [1, '1'], [1, '0'], [1, '1'], [1, '0'], [1, '1'], [1, '0'], [1, '1'], [1, '0'], [1, '1'], [1, '0'], [1, '1'], [1, '0'], [1, '1'], [1, '0'], [1, '1'], [1, '0'], [1, '1'], [1, '0'], [1, '1'], [1, '0'], [1, '1'], [1, '0'], [1, '1'], [1, '0'], [1, '1'], [1, '0'], [1, '1'], [1, '0'], [1, '1'], [1, '0'], [1, '1'], [1, '0'], [1, '1'], [1, '0'], [1, '1'], [1, '0'], [1, '1'], [1, '0'], [1, '1'], [1, '0'], [1, '1'], [1, '0'], [1, '1'], [1, '0'], [1, '1'], [1, '0'], [1, '1'], [1, '0'], [1, '1'], [1, '0'], [1, '1'], [1, '0'], [1, '1'], [1, '0'], [1, '1'], [1, '0'], [1, '1'], [1, '0'], [1, '1'], [1, '0'], [1, '1'], [1, '0'], [1, '1'], [1, '0'], [1, '1'], [1, '0'], [1, '1'], [1, '0'], [1, '1'], [1, '0'], [1, '1'], [1, '0'], [1, '1'], [1, '0'], [1, '1'], [1, '0'], [1, '1'], [1, '0'], [1, '1'], [1, '0'], [1, '1'], [1, '0'], [1, '1'], [1, '0'], [1, '1'], [1, '0'], [1, '1'], [1, '0'], [1, '1'], [1, '0'], [1, '1'], [1, '0'], [1, '1'], [1, '0'], [1, '1'], [1, '0'], [1, '1'], [1, '0'], [1, '1'], [1, '0'], [1, '1'], [1, '0'], [1, '1'], [1, '0'], [1, '1'], [1, '0'], [1, '1'], [1, '0'], [1, '1'], [1, '0'], [1, '1'], [1, '0'], [1, '1'], [1, '0'], [1, '1'], [1, '0'], [1, '1'], [1, '0'], [1, '1'], [1, '0'], [1, '1'], [1, '0'], [1, '1'], [1, '0'], [1, '1'], [1, '0'], [1, '1'], [1, '0'], [1, '1'], [1, '0'], [1, '1'], [1, '0'], [1, '1'], [1, '0'], [1, '1'], [1, '0'], [1, '1'], [1, '0'], [1, '1'], [1, '0'], [1, '1'], [1, '0'], [1, '1'], [1, '0'], [1, '1'], [1, '0'], [1, '1'], [1, '0'], [1, '1'], [1, '0'], [1, '1'], [1, '0'], [1, '1'], [1, '0'], [1, '1'], [1, '0'], [1, '1'], [1, '0'], [1, '1'], [1, '0'], [1, '1'], [1, '0'], [1, '1'], [1, '0'], [1, '1'], [1, '0'], [1, '1'], [1, '0'], [1, '1'], [1, '0'], [1, '1'], [1, '0'], [1, '1'], [1, '0'], [1, '1'], [1, '0'], [1, '1'], [1, '0'], [1, '1'], [1, '0'], [1, '1'], [1, '0']] Length: 4000
Worst case Decoded: 1010101010101010101010101010101010101010101010101010101010101010101010101010101010101010101010101010101010101010101010101010101010101010101010101010101010101010101010101010101010101010101010101010101010101010101010101010101010101010101010101010101010101010101010101010101010101010101010101010101010101010101010101010101010101010101010101010101010101010101010101010101010101010101010101010101010101010 Length: 400